| [ Q-Car Home ] [ What's New ] [ Product Listings ] [ Ordering ] [ Information ] [ About Us ] |
|
|
|
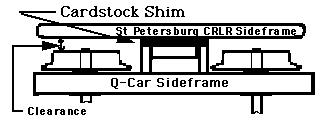
Start with the installation of the Q-Car Trailer truck. Decide if you want your trailer in the front or the rear of your car. Remove the floor from the car, and unscrew both dummy trucks. You can remove the frames from these trucks by Use a good quality ACC to mount the frames to our trucks. Make sure the wheels do not rub against the plastic frames. Because of inconsistencies in both the plastic and white metal frames you may have to insert a cardboard shim to keep the plastic frames a minimum of .015 from the ends of the wheels. 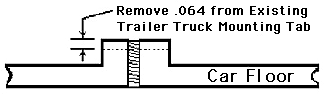
To mount the trailer trucks, either machine or file approximately .064 from the floor stub. Tap the hole with a 3-48 tap or carefully drive the 3-48 screw provided with the Q-Car truck into the stub hole. You can now use this screw to mount the trailer truck. To mount the power truck you must cut a nickel (five cent piece) size hole at the power truck end of the car floor. Over this you will mount either the bolster provided or for a more finished look you You may have to remove some of the material from in front and the rear of the .75 hole (the shaded area in the drawing). This will allow clearance for the top of the motor and gear box at both ends of the opening. When doing this work great care must be taken not to get plastic filings on the interior of the model. Brush any lose material from the floor before you do any test fitting. Static electricity will have that material sticking to the glazing, and you will not be happy trying to get it off. Vacuum the floor after each machining step. One final caution, to reduce the chance of scratching the very fine paint work on these models we recommend you place the body on a clean soft rubber pad. Return to the Information Page. Return to the Truck Installation page. |
| [ Back to Top ][ Q-Car Co. - Home ][ contact@qcarcompany.com ] | Page Last Modified: 23-Mar-24 3:58 PM |

 carefully prying with a small spade screwdriver between the frame stub and the truck assembly. They should just pop off.
 can fabricate a one inch square .015 plate with a .1875 hole in the center. This hole is covered with a .375 inch square plate or a washer soldered over the hole. In this plate there is a .087 hole for the truck stub bolt to pass through. This sandwich of plates is mounted to INSIDE of the car floor with either glue or small screws. Once in place you can mount the power truck using the stop nut provided with the truck. Drill a 2 mm hole at the motor end for the motor lead to pass through the floor.
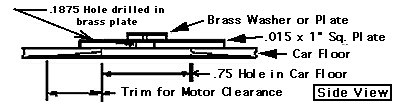
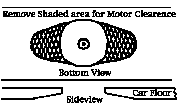 This is a tapered removal; starting from the hole remove approximately half the thickness of the floor and taper it out until you are level with the bottom of the car floor.